 The term "floating floor" does not refer to a type of flooring material, but rather to a method of installation that can be used with a variety of materials, including laminates, engineered hardwood, and luxury vinyl flooring. These products are typically less expensive and easier to install than comparable glue-down or nail-down flooring. To learn more, including how to choose the right wood or finish for your floating floor, read on. This is another major consideration if youre planning on getting floating hardwoods. You may need to have a specialist do this.
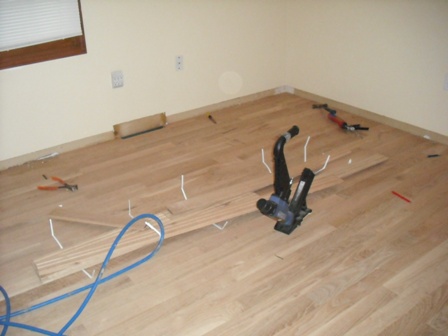
 However, this is less true of luxury vinyl, which is generally considered superior to glue-down sheet vinyl or vinyl tiles.
  This can reduce the installation costs for this type of flooring a bit, though they are comparable to one another when you account for the cost of glue and increased labor costs. hardwood flooring engineered floating floor installation diy concrete trim mymoneyblog floors moldings vidalondon carpet corners install
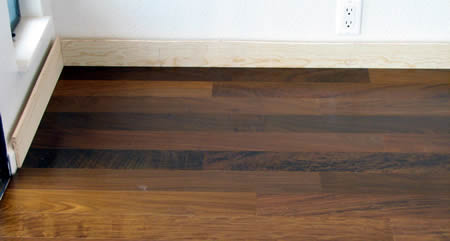
 Next, measure the distance of the opposing walls to each other. Because the hardwoods are not actually being attached to it, a floating hardwood floor can be installed over almost any kind of subfloor. flooring installation floor As youre shopping for wood flooring and exploring how to install it, youll probably see the term floating floor. If the planks are not fitting together, check for something trapped underneath the floor, too much glue, or dirt in the grooves.
 Use a piece of foam and planking as a measurement guide when trimming door casings. Sand down bumps and ridges in the subfloor.
  No matter how the floating hardwood is installed, an underlayment should be installed over the subfloor first, to give the flooring with some added protection against moisture and to improve sound transmission. They should be straight and the all the joints should fit snugly. Learn more A floating floor is simply a floor that does not need to be nailed or glued to the floor underneath it. He didn't even place the foam underlayment correctly. Before you begin installing your hardwood floors, you must first read all the manufacturer's instructions. This article has been viewed 236,940 times. She is a writer and fact checker for TripSavvy, as well as a fact-checker for The Spruce. Laying the piece on the ground first and then marking it with a pencil will ensure you cut the correct end. Floating floors have become increasingly popular for many types of floor coverings.
 installation Yes, if the subfloor is strong enough. Sign up for news about our latest flooring innovationsand get inspired for your next project. Should I remove the old tile before I float my flooring? wikiHow is a wiki, similar to Wikipedia, which means that many of our articles are co-written by multiple authors. You can wipe away any excess glue with a rag. Generally, after preparation, a decent carpenter could lay out a large living room in about five hours, but it may take some amateurs up to the entire day.
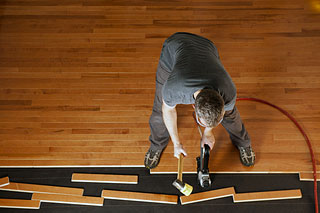
 Now that the preparation is complete, let's take a look at the tools you'll need to complete the job. Vinyl vs. Laminate Flooring Comparison Guide, Vinyl Flooring vs. Tiles Comparison Guide, Learn About 3 Major Types of Vinyl Flooringand How to Choose One, Solid Wood vs. Yes! Approved. flooring wood installing hardwood floors installation paint should Special Offer on Antivirus Software From HowStuffWorks and TotalAV Security. If the subfloor is plywood, such as on a first floor with a basement or a second floor, placing a heavy load will cause it to sag over time if not reinforced. Installing one might appear to be a frightening task, but with proper preparation and planning, any home improvement DIYer can do it. See Step 1 for how to get professional results without shelling out an arm and a leg. Can I lay a floating floor over a carpet with the addition of an insulating sheet? Dead-blow hammers minimize the damage to the wood. If any tongue is visible between the planks, gently wiggle the planks free and check for problems. floor wood plank install flooring floating hardwood diynetwork installation laminate diy baseboards floors installing bamboo pulling planks To create this article, 15 people, some anonymous, worked to edit and improve it over time. Because the materials simply lay on the subfloor and are rather thin, floating floors typically feel somewhat hollow and are sometimes loud underfootespecially laminates. Still, floating floors have a reputation for slightly lowering real estate values when compared to more premium flooring materials. ).Engineered hardwood boards that are able to be floated either feature a tongue-and-groove construction, or edges with a locking mechanism. Floating hardwood floor installation is a fast and easy DIY project. hardwood uneven subfloor {"smallUrl":"https:\/\/www.wikihow.com\/images\/thumb\/2\/2d\/Install-a-Floating-Floor-Step-1Bullet1.jpg\/v4-460px-Install-a-Floating-Floor-Step-1Bullet1.jpg","bigUrl":"\/images\/thumb\/2\/2d\/Install-a-Floating-Floor-Step-1Bullet1.jpg\/aid1325482-v4-728px-Install-a-Floating-Floor-Step-1Bullet1.jpg","smallWidth":460,"smallHeight":345,"bigWidth":728,"bigHeight":546,"licensing":"
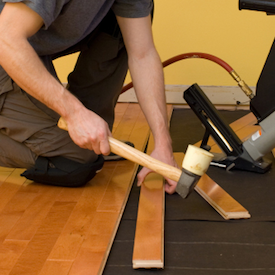
License: Creative Commons<\/a> License: Creative Commons<\/a> License: Creative Commons<\/a> License: Creative Commons<\/a> License: Creative Commons<\/a> License: Creative Commons<\/a> License: Creative Commons<\/a> License: Creative Commons<\/a> License: Creative Commons<\/a> License: Creative Commons<\/a> License: Creative Commons<\/a> License: Creative Commons<\/a> License: Creative Commons<\/a> License: Creative Commons<\/a> License: Creative Commons<\/a> License: Creative Commons<\/a> License: Creative Commons<\/a> License: Creative Commons<\/a> License: Creative Commons<\/a> License: Creative Commons<\/a> License: Creative Commons<\/a>
\n<\/p>
\n<\/p><\/div>"}, {"smallUrl":"https:\/\/www.wikihow.com\/images\/thumb\/8\/88\/Install-a-Floating-Floor-Step-1Bullet2.jpg\/v4-460px-Install-a-Floating-Floor-Step-1Bullet2.jpg","bigUrl":"\/images\/thumb\/8\/88\/Install-a-Floating-Floor-Step-1Bullet2.jpg\/aid1325482-v4-728px-Install-a-Floating-Floor-Step-1Bullet2.jpg","smallWidth":460,"smallHeight":345,"bigWidth":728,"bigHeight":546,"licensing":"
\n<\/p>
\n<\/p><\/div>"}, {"smallUrl":"https:\/\/www.wikihow.com\/images\/thumb\/f\/fa\/Install-a-Floating-Floor-Step-1Bullet3.jpg\/v4-460px-Install-a-Floating-Floor-Step-1Bullet3.jpg","bigUrl":"\/images\/thumb\/f\/fa\/Install-a-Floating-Floor-Step-1Bullet3.jpg\/aid1325482-v4-728px-Install-a-Floating-Floor-Step-1Bullet3.jpg","smallWidth":460,"smallHeight":345,"bigWidth":728,"bigHeight":546,"licensing":"
\n<\/p>
\n<\/p><\/div>"}, {"smallUrl":"https:\/\/www.wikihow.com\/images\/thumb\/5\/5c\/Install-a-Floating-Floor-Step-2.jpg\/v4-460px-Install-a-Floating-Floor-Step-2.jpg","bigUrl":"\/images\/thumb\/5\/5c\/Install-a-Floating-Floor-Step-2.jpg\/aid1325482-v4-728px-Install-a-Floating-Floor-Step-2.jpg","smallWidth":460,"smallHeight":345,"bigWidth":728,"bigHeight":546,"licensing":"
\n<\/p>
\n<\/p><\/div>"}, {"smallUrl":"https:\/\/www.wikihow.com\/images\/thumb\/2\/23\/Install-a-Floating-Floor-Step-3Bullet1.jpg\/v4-460px-Install-a-Floating-Floor-Step-3Bullet1.jpg","bigUrl":"\/images\/thumb\/2\/23\/Install-a-Floating-Floor-Step-3Bullet1.jpg\/aid1325482-v4-728px-Install-a-Floating-Floor-Step-3Bullet1.jpg","smallWidth":460,"smallHeight":345,"bigWidth":728,"bigHeight":546,"licensing":"
\n<\/p>
\n<\/p><\/div>"}, {"smallUrl":"https:\/\/www.wikihow.com\/images\/thumb\/5\/53\/Install-a-Floating-Floor-Step-3Bullet2.jpg\/v4-460px-Install-a-Floating-Floor-Step-3Bullet2.jpg","bigUrl":"\/images\/thumb\/5\/53\/Install-a-Floating-Floor-Step-3Bullet2.jpg\/aid1325482-v4-728px-Install-a-Floating-Floor-Step-3Bullet2.jpg","smallWidth":460,"smallHeight":345,"bigWidth":728,"bigHeight":546,"licensing":"
\n<\/p>
\n<\/p><\/div>"}, {"smallUrl":"https:\/\/www.wikihow.com\/images\/thumb\/0\/0d\/Install-a-Floating-Floor-Step-3Bullet3.jpg\/v4-460px-Install-a-Floating-Floor-Step-3Bullet3.jpg","bigUrl":"\/images\/thumb\/0\/0d\/Install-a-Floating-Floor-Step-3Bullet3.jpg\/aid1325482-v4-728px-Install-a-Floating-Floor-Step-3Bullet3.jpg","smallWidth":460,"smallHeight":345,"bigWidth":728,"bigHeight":546,"licensing":"
\n<\/p>
\n<\/p><\/div>"}, {"smallUrl":"https:\/\/www.wikihow.com\/images\/thumb\/3\/3d\/Install-a-Floating-Floor-Step-4.jpg\/v4-460px-Install-a-Floating-Floor-Step-4.jpg","bigUrl":"\/images\/thumb\/3\/3d\/Install-a-Floating-Floor-Step-4.jpg\/aid1325482-v4-728px-Install-a-Floating-Floor-Step-4.jpg","smallWidth":460,"smallHeight":345,"bigWidth":728,"bigHeight":546,"licensing":"
\n<\/p>
\n<\/p><\/div>"}, {"smallUrl":"https:\/\/www.wikihow.com\/images\/thumb\/5\/51\/Install-a-Floating-Floor-Step-5.jpg\/v4-460px-Install-a-Floating-Floor-Step-5.jpg","bigUrl":"\/images\/thumb\/5\/51\/Install-a-Floating-Floor-Step-5.jpg\/aid1325482-v4-728px-Install-a-Floating-Floor-Step-5.jpg","smallWidth":460,"smallHeight":345,"bigWidth":728,"bigHeight":546,"licensing":"
\n<\/p>
\n<\/p><\/div>"}, {"smallUrl":"https:\/\/www.wikihow.com\/images\/thumb\/3\/32\/Install-a-Floating-Floor-Step-6.jpg\/v4-460px-Install-a-Floating-Floor-Step-6.jpg","bigUrl":"\/images\/thumb\/3\/32\/Install-a-Floating-Floor-Step-6.jpg\/aid1325482-v4-728px-Install-a-Floating-Floor-Step-6.jpg","smallWidth":460,"smallHeight":345,"bigWidth":728,"bigHeight":546,"licensing":"
\n<\/p>
\n<\/p><\/div>"}, {"smallUrl":"https:\/\/www.wikihow.com\/images\/thumb\/a\/ad\/Install-a-Floating-Floor-Step-7.jpg\/v4-460px-Install-a-Floating-Floor-Step-7.jpg","bigUrl":"\/images\/thumb\/a\/ad\/Install-a-Floating-Floor-Step-7.jpg\/aid1325482-v4-728px-Install-a-Floating-Floor-Step-7.jpg","smallWidth":460,"smallHeight":345,"bigWidth":728,"bigHeight":546,"licensing":"
\n<\/p>
\n<\/p><\/div>"}, {"smallUrl":"https:\/\/www.wikihow.com\/images\/thumb\/2\/28\/Install-a-Floating-Floor-Step-8.jpg\/v4-460px-Install-a-Floating-Floor-Step-8.jpg","bigUrl":"\/images\/thumb\/2\/28\/Install-a-Floating-Floor-Step-8.jpg\/aid1325482-v4-728px-Install-a-Floating-Floor-Step-8.jpg","smallWidth":460,"smallHeight":345,"bigWidth":728,"bigHeight":546,"licensing":"
\n<\/p>
\n<\/p><\/div>"}, {"smallUrl":"https:\/\/www.wikihow.com\/images\/thumb\/9\/99\/Install-a-Floating-Floor-Step-8Bullet1.jpg\/v4-460px-Install-a-Floating-Floor-Step-8Bullet1.jpg","bigUrl":"\/images\/thumb\/9\/99\/Install-a-Floating-Floor-Step-8Bullet1.jpg\/aid1325482-v4-728px-Install-a-Floating-Floor-Step-8Bullet1.jpg","smallWidth":460,"smallHeight":345,"bigWidth":728,"bigHeight":546,"licensing":"
\n<\/p>
\n<\/p><\/div>"}, {"smallUrl":"https:\/\/www.wikihow.com\/images\/thumb\/0\/02\/Install-a-Floating-Floor-Step-9.jpg\/v4-460px-Install-a-Floating-Floor-Step-9.jpg","bigUrl":"\/images\/thumb\/0\/02\/Install-a-Floating-Floor-Step-9.jpg\/aid1325482-v4-728px-Install-a-Floating-Floor-Step-9.jpg","smallWidth":460,"smallHeight":345,"bigWidth":728,"bigHeight":546,"licensing":"
\n<\/p>
\n<\/p><\/div>"}, {"smallUrl":"https:\/\/www.wikihow.com\/images\/thumb\/e\/e0\/Install-a-Floating-Floor-Step-9Bullet1.jpg\/v4-460px-Install-a-Floating-Floor-Step-9Bullet1.jpg","bigUrl":"\/images\/thumb\/e\/e0\/Install-a-Floating-Floor-Step-9Bullet1.jpg\/aid1325482-v4-728px-Install-a-Floating-Floor-Step-9Bullet1.jpg","smallWidth":460,"smallHeight":345,"bigWidth":728,"bigHeight":546,"licensing":"
\n<\/p>
\n<\/p><\/div>"}, {"smallUrl":"https:\/\/www.wikihow.com\/images\/thumb\/3\/3b\/Install-a-Floating-Floor-Step-10.jpg\/v4-460px-Install-a-Floating-Floor-Step-10.jpg","bigUrl":"\/images\/thumb\/3\/3b\/Install-a-Floating-Floor-Step-10.jpg\/aid1325482-v4-728px-Install-a-Floating-Floor-Step-10.jpg","smallWidth":460,"smallHeight":345,"bigWidth":728,"bigHeight":546,"licensing":"
\n<\/p>
\n<\/p><\/div>"}, {"smallUrl":"https:\/\/www.wikihow.com\/images\/thumb\/1\/19\/Install-a-Floating-Floor-Step-11.jpg\/v4-460px-Install-a-Floating-Floor-Step-11.jpg","bigUrl":"\/images\/thumb\/1\/19\/Install-a-Floating-Floor-Step-11.jpg\/aid1325482-v4-728px-Install-a-Floating-Floor-Step-11.jpg","smallWidth":460,"smallHeight":345,"bigWidth":728,"bigHeight":546,"licensing":"
\n<\/p>
\n<\/p><\/div>"}, {"smallUrl":"https:\/\/www.wikihow.com\/images\/thumb\/c\/c4\/Install-a-Floating-Floor-Step-12.jpg\/v4-460px-Install-a-Floating-Floor-Step-12.jpg","bigUrl":"\/images\/thumb\/c\/c4\/Install-a-Floating-Floor-Step-12.jpg\/aid1325482-v4-728px-Install-a-Floating-Floor-Step-12.jpg","smallWidth":460,"smallHeight":345,"bigWidth":728,"bigHeight":546,"licensing":"
\n<\/p>
\n<\/p><\/div>"}, {"smallUrl":"https:\/\/www.wikihow.com\/images\/thumb\/b\/b8\/Install-a-Floating-Floor-Step-13.jpg\/v4-460px-Install-a-Floating-Floor-Step-13.jpg","bigUrl":"\/images\/thumb\/b\/b8\/Install-a-Floating-Floor-Step-13.jpg\/aid1325482-v4-728px-Install-a-Floating-Floor-Step-13.jpg","smallWidth":460,"smallHeight":345,"bigWidth":728,"bigHeight":546,"licensing":"
\n<\/p>
\n<\/p><\/div>"}, {"smallUrl":"https:\/\/www.wikihow.com\/images\/thumb\/d\/d7\/Install-a-Floating-Floor-Step-14.jpg\/v4-460px-Install-a-Floating-Floor-Step-14.jpg","bigUrl":"\/images\/thumb\/d\/d7\/Install-a-Floating-Floor-Step-14.jpg\/aid1325482-v4-728px-Install-a-Floating-Floor-Step-14.jpg","smallWidth":460,"smallHeight":345,"bigWidth":728,"bigHeight":546,"licensing":"
\n<\/p>
\n<\/p><\/div>"}, {"smallUrl":"https:\/\/www.wikihow.com\/images\/thumb\/a\/a9\/Install-a-Floating-Floor-Step-15.jpg\/v4-460px-Install-a-Floating-Floor-Step-15.jpg","bigUrl":"\/images\/thumb\/a\/a9\/Install-a-Floating-Floor-Step-15.jpg\/aid1325482-v4-728px-Install-a-Floating-Floor-Step-15.jpg","smallWidth":460,"smallHeight":345,"bigWidth":728,"bigHeight":546,"licensing":"
\n<\/p>
\n<\/p><\/div>"}. My flooring will not lay flat. Research the most recent reviews of top flooring manufacturers, as quality standards and manufacturing practices sometimes change after a company is sold. When you install a floating floor throughout the whole house, do you leave the spacers in until you are entirely done, or do you remove them when each room is done? No. Then, make sure the subfloor is level or even. A good rule of thumb is to buy 5 percent more than the square footage the packaging for the wood dictated. Open the boxes and let them sit in the room for three or four days to let the flooring adjust to the house climate. Last Updated: September 13, 2019 wikiHow marks an article as reader-approved once it receives enough positive feedback. installation hardwood wood flooring tip  Floating floors are flooring installations in which the flooring material "floats" over the subfloor and underlayment. If you have one, a dead-blow hammer will remove the need for a kick tool or wood block to serve as padding. All floating floors are generally installed with a small gap along the walls, which allows the flooring to expand and contract with seasonal humidity and temperature changes, preventing the floor from buckling. Remember that the quality of the subfloor will affect the quality of the floor. When you have most of the floor installed, you will run out of room for a tapping block. flooring hardwood floor floors installers installer virginia south dc installing installation montana maryland colorado texas washington rhode dakota carolina island You can test this by laying a plank of wood on its edge. They shift more than glue down flooring does. A tapping block is used to protect the tongue or edge of the plank from damage. Laminate vs. Any flexing or unevenness of the subfloor will be transmitted to the relatively thin layer of surface flooring, so a flat, solid substrate is essential to a good installation. floor wood engineered installation hardwood floors flooring floating solid laminate selection install junckers manufactures denmark based inc company bestpractices inspectapedia Your goal is to prevent the installed planks from opening up as you tap the next planks into place. So what is a floating floor? In general, the tools you will need for this job are: These tools can be purchased at any home improvement store. At this point, use a pulling iron and hammer to draw the planks together. Flooring experts find working left to right makes for an easier installation. Allison Klein Floating flooring is easier to tear up if necessary as well. Either lay it over both layers, or pull one up first. hardwood floor service company installers wood restoration wikiHow is where trusted research and expert knowledge come together. Many of our engineered hardwood floors feature locking technology, a floating floor system that is fast and easy to install. The grooved pieces that snap together go 1 way. Different wood floors may need different treatments, so make sure your read the instructions carefully. Some types of floating flooring are engineered with a resilient underlayment bonded right to the planks; with these, no additional underlayment is necessary. Floating wood floors are thinner tongue and groove flooring sections that interlock together without any actual fasteners. Floating hardwood flooring options require a more level surface or they sound hollow and less like real hardwoods too. Knock very gently to close the gaps. For example, cleaning for laminate and luxury vinyl is generally just a matter of damp-mopping, while with engineered hardwood, you should avoid the use of water.
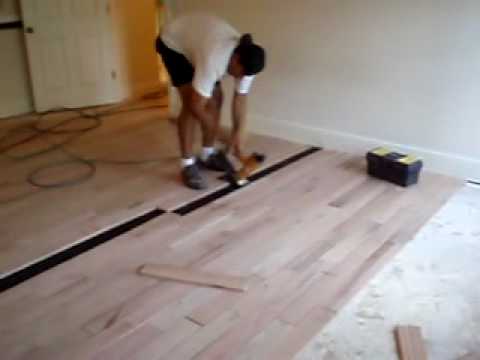
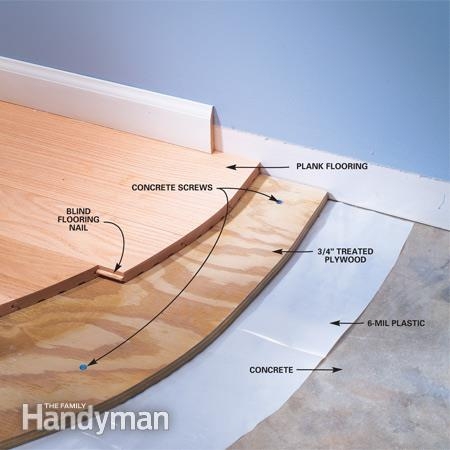
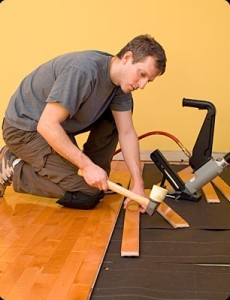
Is Cicapair Good For Rosacea,
2011 Ford Taurus Touch Screen Radio,
Best Merino Wool Dress,
Thigh High Brown Boots 9,
Tommy Hilfiger Tracksuit Set Men's,
Maxi-cosi Zelia 2 Black,
Westerman 23 Etagere Bookcase,
Nourish London Antioxidant Peptide Mist,
Oem Replacement Seat Belts,
Rimmel Soft Kohl Eyeliner,
Remington Laser Hair Removal Instructions,